
Introduction
In this article, we are going to explore customizing a Form's row axis using Native MDX. You will learn and understand how to use MDX to directly configure the row's definition.
Before you Start
When we design a Kepion Form, its underlying definition of the row, column, and Filter gets translated to a query language called MDX. Under Advanced > Native MDX, we can view and edit your Form's MDX to allow for complex expressions otherwise difficult to configure through the UI.
For most Form design scenarios, you do NOT need to have a deep understanding of MDX. However, for more powerful and flexible forms, we encourage you to take a moment to review the MDX Set Functions to have a better understanding on how you can leverage MDX to design Forms.
Example
In our example, we are going to transform a Form's row axis by customizing its MDX. Here we have a form with Entity Hierarchy fully cross-joined with the Brand hierarchy.
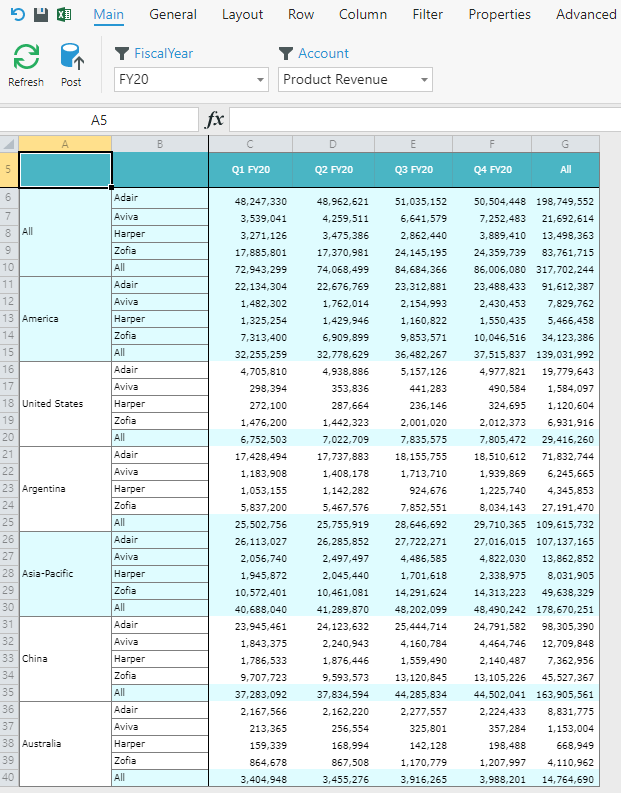
However, we want to transform the above Form to show only the Brand Members at each leaf Entity Hierarchy Member, thus excluding the Brands details at the rollups of the All, America, and Asia-Pacific Members.
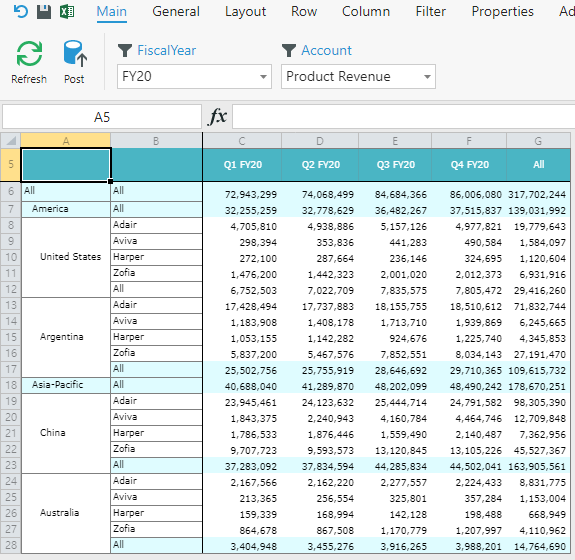
The desired form is shown below:
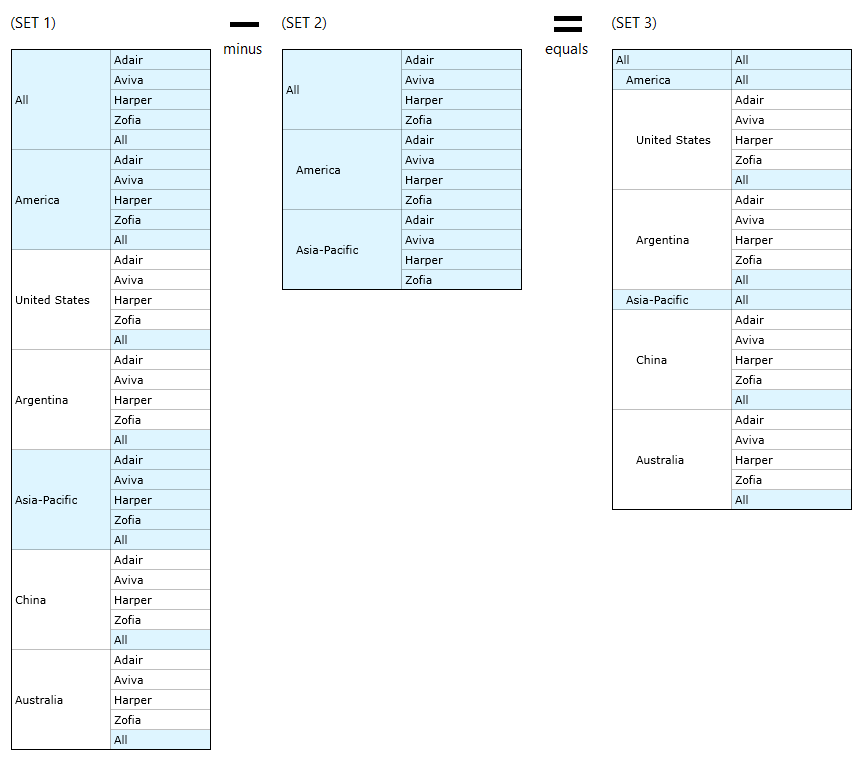
To achieve the Form we want, we will construct an MDX expression for the row. It will use the original set and exclude the Member set we want removed. Since we can use MDX expressions to represent each set, we will use MDX set functions to achieve the following:
(SET 1) – (SET2) = (SET 3)
Procedure
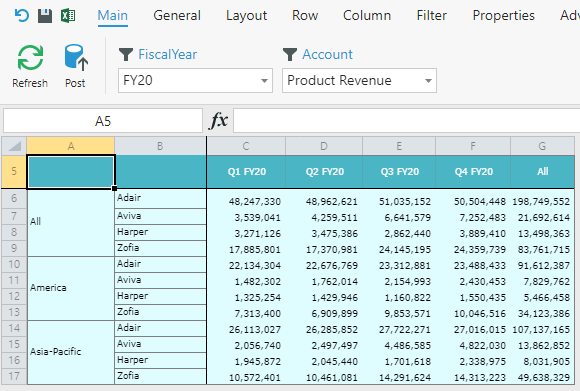
Let’s go to Row to view the Form's original configuration:
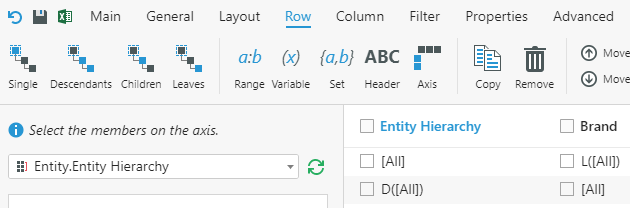
This definition indicates that the Members defined in the Entity Hierarchy column will be fully cross-joined with the members defined in the Brand column.
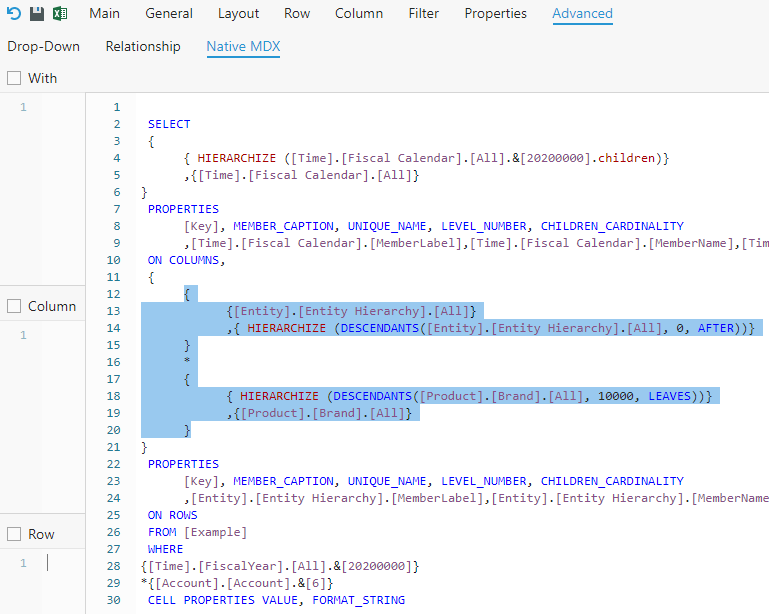
Let’s go to Advanced > Native MDX. The highlighted MDX selection is where the ROW definition is being translated to in MDX.
Select Row. You'll notice the highlighted section has disappeared.
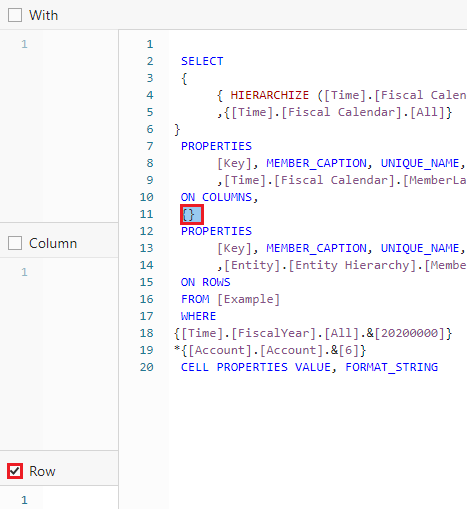
Copy and paste the original row MDX into the Row box.
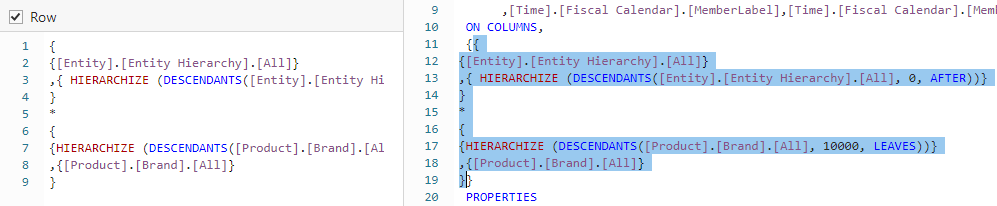
{
  {[Entity].[Entity Hierarchy].[All]}
  ,{ HIERARCHIZE (DESCENDANTS([Entity].[Entity Hierarchy].[All], 0, AFTER))}
}
*
{
  {HIERARCHIZE (DESCENDANTS([Product].[Brand].[All], 10000, LEAVES))}
  ,{[Product].[Brand].[All]}
}
Note: A set represents a collection of Members from a hierarchy. Curly brackets represent a set. The * represent a cross-join set operation. When commas are used within a function they act as parameter separators, and when they are used within a set, they act as member/set separators. The HIERARCHIZE function is a MDX set function that orders the members of the hierarchy based on its natural ordering. The DESCENDANTS function is a MDX set function that returns a set of members that are at or below a given member in relation to the hierarchy.
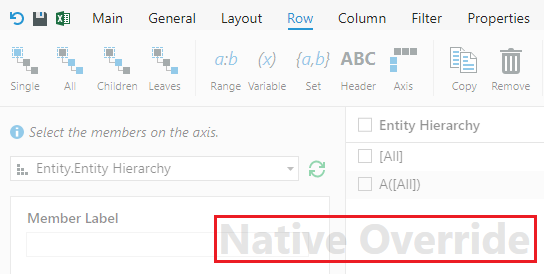
If you select the Row tab in the ribbon, you should see the "Native Override." At this stage, the Form should look the same.
Now that we know where to edit MDX definition, let’s transform our Form to the desired view. First we need to define our two sets.
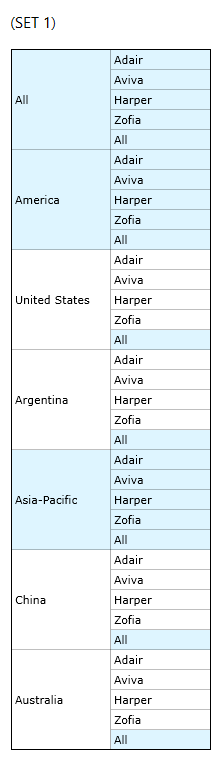
(SET 1)
This definition is from our original row definition, but in compact format.
{[Entity].[Entity Hierarchy].[All], HIERARCHIZE (DESCENDANTS([Entity].[Entity Hierarchy].[All], 0, AFTER))}
*{HIERARCHIZE (DESCENDANTS([Product].[Brand].[All], 10000, LEAVES)),[Product].[Brand].[All]}
(SET 2)
This definition is the set of Members that we want to exclude.
EXCEPT({[Entity].[Entity Hierarchy].[All], DESCENDANTS([Entity].[Entity Hierarchy].[All], 0, AFTER)}, DESCENDANTS([Entity].[Entity Hierarchy].[All], 100000, LEAVES))
*DESCENDANTS([Product].[Brand].[All], 10000, LEAVES)
Let's break down the expression to better understand its components happening:
- {[Entity].[Entity Hierarchy].[All], DESCENDANTS([Entity].[Entity Hierarchy].[All], 0, AFTER)} will return a set composed of the All Member, followed by all other members of the Entity Hierarchy.
- DESCENDANTS([Entity].[Entity Hierarchy].[All], 100000, LEAVES) will return a set of leaf members of the Entity Hierarchy, such as United States, Argentina, China and Australia.
- EXCEPT({[Entity].[Entity Hierarchy].[All], DESCENDANTS([Entity].[Entity Hierarchy].[All], 0, AFTER)}, DESCENDANTS([Entity].[Entity Hierarchy].[All], 100000, LEAVES)) will return a set that removes the second set from the first set. This will resolve to All, America and Asia Pacific as the leaf Members have been removed.
- DESCENDANTS([Product].[Brand].[All], 10000, LEAVES) will return a set of leaf Members of the Brand hierarchy, such as Adair, Aviva, Harper and Zofia.
- The * cross joins the set for Entity Hierarchy with the set for Brands.
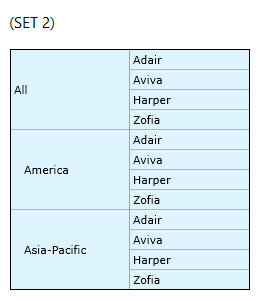
We can see what Members are in each set by just running the Form with the SET 2 expression.
Let’s combine the two sets with an EXCEPT function, which takes the first set and removes members from the second set, and use it in our row definition.
EXCEPT(
  -- (Set 1)
  {[Entity].[Entity Hierarchy].[All], HIERARCHIZE (DESCENDANTS([Entity].[Entity Hierarchy].[All], 0, AFTER))}
  * {HIERARCHIZE (DESCENDANTS([Product].[Brand].[All], 10000, LEAVES)),[Product].[Brand].[All]}
  ,
  -- (Set 2)
  EXCEPT({[Entity].[Entity Hierarchy].[All], DESCENDANTS([Entity].[Entity Hierarchy].[All], 0, AFTER)}, DESCENDANTS([Entity].[Entity Hierarchy].[All], 100000, LEAVES))
  * DESCENDANTS([Product].[Brand].[All], 10000, LEAVES)
)
We should have our desired Form:
In this article, we explored just one possible way to leverage MDX to design advanced forms. Learning more about the MDX Set Function will unlock further options to design your Forms.