
A Rolling Forecast is a financial model that dynamically updates over a period of time, once the actual data is available.
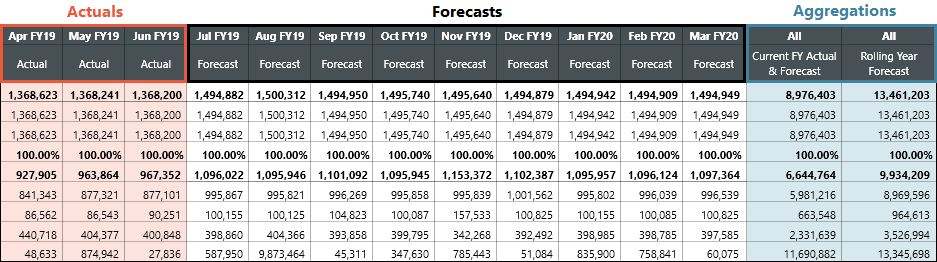
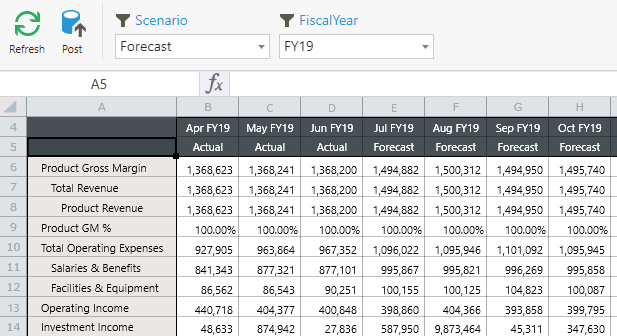
To configure a Rolling Forecast, we’ll need to design a Form that can be dynamically updated each month using application variables. Below is an example Form configured as a Rolling Forecast. Values up to the current month are reported as actuals, while future values FY are forecasted, with the totals aggregated at the end.
Before You Begin
You must correctly configure the column axis to create a Rolling Forecast. The column axis includes both the Time Dimension and Scenario Dimension. Rather than specifying a static set of Members for the Time Dimension, we'll define standard variables to dynamically scope the forecast range. The scope will always be based on the current month.
Configure Variable Definitions
First, we need to create a standard variable called Current Month. This variable will represent the Time Dimension's MemberId for the current month. It will be used to split the months into prior months for actual data, and future months for forecast data.
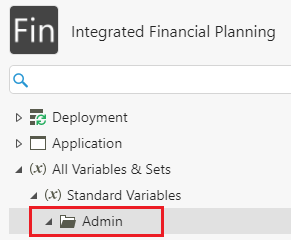
1. Go to the target Application in the Modeler.
2. On the right navigation pane, go to All Variables & Sets > Standard Variables > Admin.
3. Click Add.

4. Enter Current Month for the Variable Name.
5. Enter the current year, month, and date (typically 00) for the Definition.
- For example, April FY19 would be 20190400.
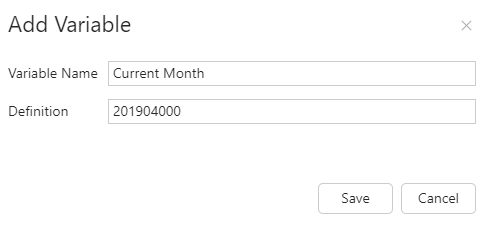
6. Click Save.
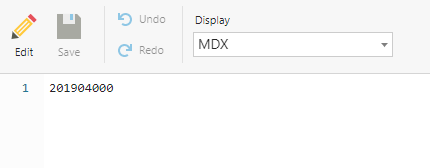
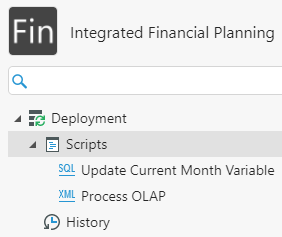
You should end up on the following screen:
Deployment Script (optional)
You will have to update the Current Month variable every month for the Form to display properly. But you can use SQL Deployment Scripts to automatically track and update the variable's current date. The following is an example of such a script, which will run every time a user deploys the Application.
UPDATE [dbo].[ApplicationVariables]
   SET [VariableValue] =  (SELECT CONVERT(varchar(12) , GETDATE(), 112 )) / 100 * 100
WHERE VariableName = N'Current Month'
7. Add another standard variable called Rolling Prior Months, which displays the correct forecasting timeframe prior to the current month.
8. Enter the following MDX script for the Definition:
NULL:[Time].[Months].&[${Current Month}].Lag(1)
- The format NULL:[Member] indicates all Members before, and including, the specified member.
- .Lag(1) indicates that we want the member one (1) before the specified member.
- Including the ${Current Month} variable we defined in the first step allows us to easily update the range each month.
9. Add a last standard variable called Rolling Forward Months, which displays the correct forecasting timeframe after the current month.
10. Enter the following MDX script for the Definition:
[Time].[Months].&[${Current Month}]:NULL
- [Member]:NULL creates the reverse behavior, indicating all Members after, and including, the specified member.
- Including the ${Current Month} variable again makes this query more dynamic, and easier to update each month.
Note: It's also possible to define these variables using [Time].[Fiscal Calendar]. Both definitions would produce the same results, however you must match the hierarchy in the variable definition with the hierarchy used in the Form.
Define Form Structure
Now let's configure our Rolling Forecast on an existing or new Form. In the example below, we've created a simple Form with just the Account, Scenario, and Time Dimensions.
1. Open the target Form, click the Edit icon, and go to Layout.

2. Configure the Row, Column, and Filter:
- For the Row, add the Account Hierarchy.
- For the Column, add the Scenario and Months Hierarchies (we defined the variables using the [Time].[Months] hierarchy).
- For the Filter, add FiscalYear.
- For the Filter Variable, add the Scenario Hierarchy.

3. Go to Row and configure the axis as you wish.

4. Go to Column.

5. Click the drop-down menu to select the target Dimension.
6. Click Variable to add both the Application Variables and Filter Variables.

The first row tells the Form to display only Actual values for all months prior to the current month. The second row tells the Form to display the Scenario filter selection for all months after the current month.
Preview the Form. it should correctly show all months prior to the current month as actuals. If you change the Scenario filter selection, the forward months should continue to change as normal, but the prior months should remain static.
Calculate Aggregated Totals
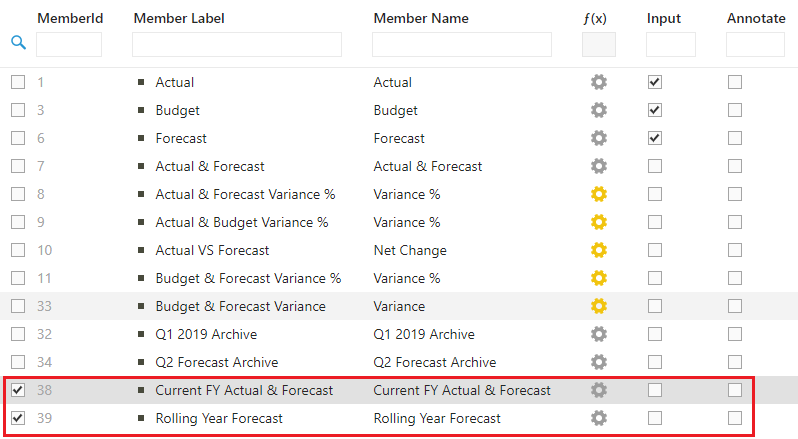
We'll need to create two Scenario Dimension Members to hold the Current FY Actual & Forecast total and the Rolling Year Forecast total. The first scenario will show the sum of both the actual and forecast values for the year, while the second scenario will show the sum of the forecast values for the next 12 months.
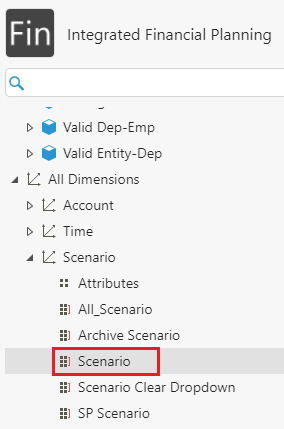
1. Go to All Dimensions > Scenario > Scenario.
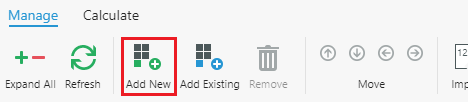
2. Select Add New.
3. Double-click the new Member and enter Current FY Actual & Forecast in the Member Label column.
4. Repeat steps 2 and 3, except enter Rolling Year Forecast for the Member Label.
5. Open the Form and go to Column.
6. Update the column definition as follows:

Since we want these columns to display customized totals, we'll need to define the calculations for them manually, via an MDX Rule.
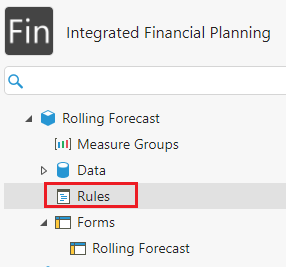
7. Go to Rules in the Model containing your target Form.
8. Click Add.
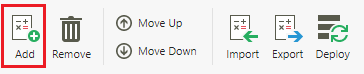
9. Enter Dynamic for the Rule Name and select MDX for the Rule Type.

10. Copy and paste the following MDX Script into your rule. This defines the two new scenarios as the calculations we outlined above. .
/*-----------------------
    Scenario Aggregation
*/-----------------------

//Current FY Actual & Forecast:
//Part 1: Using Actual values for months ranged between January and the month before current
SCOPE
(
    [Scenario].[Scenario].[Current FY Actual & Forecast]
    ,{[Time].[Fiscal Calendar].&[${Current Month}].Parent.Parent.FirstChild.FirstChild
      :[Time].[Fiscal Calendar].&[${Current Month}].Lag(1)}
);
THIS = [Scenario].[Scenario].[Actual];
END SCOPE;

//Part 2: Using Forecast values for months ranged between current month and December
SCOPE
(
    [Scenario].[Scenario].[Current FY Actual & Forecast]
    ,{[Time].[Fiscal Calendar].&[${Current Month}]
      :[Time].[Fiscal Calendar].&[${Current Month}].Parent.Parent.LastChild.LastChild}
);
THIS = [Scenario].[Scenario].[Forecast];
END SCOPE;

//Rolling Year Forecast: Using Forecast values for current months and next 11 months
SCOPE
(
    [Scenario].[Scenario].[Rolling Year Forecast]
    ,{[Time].[Fiscal Calendar].&[${Current Month}]
      :[Time].[Fiscal Calendar].&[${Current Month}].Lag(-12)}
);
THIS = [Scenario].[Scenario].[Forecast];
END SCOPE;
11. Save and deploy the Application.
Note: Make sure the MemberLabels for your scenarios exactly match those in the script.
Tip: In this instance, we can use either [Time].[Fiscal Calendar] or [Time].[Months] to achieve the same result, regardless of which one we used in our application variables or Form layout.
You should now have a Form similar to the one below: