
Introduction
Users can run complex Business Rules on any selected data cell in a Form. A popular scenario involving this functionality is allocating data (top-down) at different levels of aggregation. Let's take a look at how you would configure your Application for this scenario.
Example
In our sample Application, we provide two methods to allocate data:
- Set a target at any level of the hierarchy, and the rule will allocate the target data to the leaves proportionally.
- Increase or decrease any value by a certain percentage along the hierarchy, and the rule will adjust all its leaf members value by the percentage.
Users can select one or multiple cells in the Form, right-click, and select the relevant Rule.

Let’s select Adjust by Percentage, enter .10, and click Run & Close.
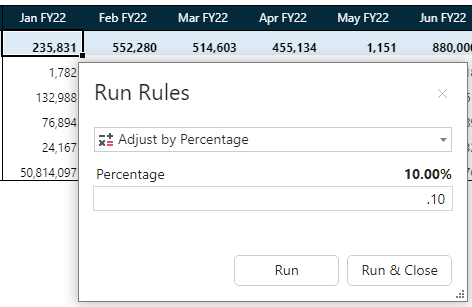
Tip: If you want to switch rules, you can select a different one from the drop-down.
The Post Invoice is a parent member, which means its value is aggregated from its children. Below, you can see the value of all its leaf members has risen by 10%, resulting in a 10% increase of the parent member.

Configure in Modeler
Go to Modeler and select your target Rule. Then, navigate to Advanced and select Include selection facts.
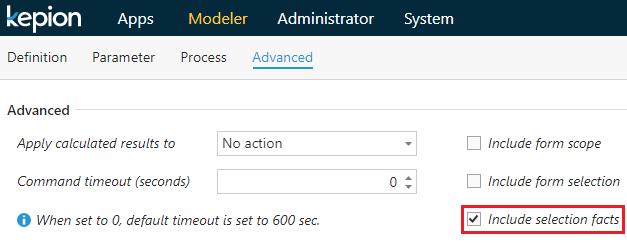
When this option is enabled, there are three parameters available in the Rule:
- @SelectionFactsContext – dbo.tMembers READONLY
- @SelectionFactsValue – FLOAT
- @SelectionFactsOverlap – BIT
The @SelectionFactsContext is a table that contains a list of Dimension Members associated with facts based on the selected cell. See the screenshot below for an example. This model contains four Dimensions–Account, Time, Entity, and Product.

When we run Rules on the selected cell, here is the @SelectionFactsContext.

The @SelectionFactsValue is the selected cell value. In this example it's 2,277.
The @SelectionFactsOverlap detects whether the selected cells overlap each other in terms of the associated fact records for each cell. If two cells share the same fact records, then @SelectionFactsOverlap will be set to 1.
Here SQL Rule's definition:
IF @SelectionFactsOverlap = 1
    PRINT N'<ERROR>Please ensure the selected cells do not have overlapping data.'
ELSE
    UPDATE F
    SET F.Value = F.Value * (1 + @Percentage)
    FROM [dbo].[F_Data Spread_CoreMG_Writeback] F
    WHERE AccountID IN (SELECT MemberID FROM @SelectionFactsContext WHERE ModelDimension = N'Account')
    AND TimeID IN (SELECT MemberID FROM @SelectionFactsContext WHERE ModelDimension = N'Time')
    AND ScenarioID IN (SELECT MemberID FROM @SelectionFactsContext WHERE ModelDimension = N'Scenario')
    AND EntityID IN (SELECT MemberID FROM @SelectionFactsContext WHERE ModelDimension = N'Entity')
    AND ProductID IN (SELECT MemberID FROM @SelectionFactsContext WHERE ModelDimension = N'Product')
Please note, when multiple cells are selected, cell context will be passed on from one Rule to the next. This means the @SelectionFactsContext and @SelectionFactsValue is relevant for only one cell at a time. In addition, you may want to run certain calculations only when all the cells are executed. The system-defined parameter @SelectionFactsIndex and @SelectionFactsCount can help you detect the last iteration of the Rule execution.
- @SelectionFactsCount – INT
- @SelectionFactsIndex – INT
The @SelectionFactsCount is the total number of cells selected in the Form.
The @SelectionFactsIndex is ranging from 0 to N-1, based on the current iteration. Here N is equal to @SelectionFactsCount. When @SelectionFactsIndex is 0, it returns NULL.
You can use the following SQL script to detect the last run:
IF ISNULL(@SelectionFactsIndex,0) = (ISNULL(@SelectionFactsCount,0) - 1)
/**
  INSERT CALCULATION LOGIC HERE
**/
Configure in Dashboard
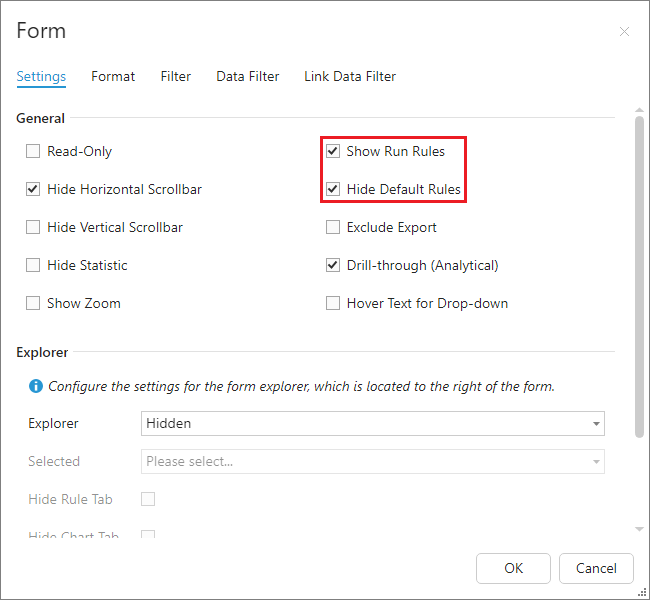
The Run Rules options in the right-click menu is hidden by default. To display it, we need to go to the target Form in the Dashboard Editor and select  . Select the Show Run Rules option in the Form configuration window.
Tip:: The Hide Default Rules option hides the built-in Adjust and Spread Rules that run on write-enabled cells.
Configure in Administrator
To show the Rules in Run Rules window, we need to attach the Rules to the Dashboard pages in the Administrator module.
Go to the Rule tab of your target App, and click Add.
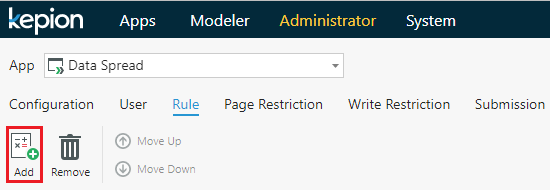
Select the Rules you want to add, and select OK.

Leave the (Hide) and (On Post) options unchecked (i.e., we want to see the Rule in the options and we don’t want to automatically run these Rules on post).

Note: The selection facts option only works on numeric data cells. The Rule will not run when only row/column cells are selected. If you need to apply it to annotation fields, programmatically populate a 0 into the Value column of the annotation records.