Introduction
In this article, let's look at how to integrate your Kepion environment with Azure Active Directory (Azure AD), step by step.
Before you start
Here's a few things you should know before you begin this process:
- Which authentication mode works best for your organization.
- How to configure a Kepion environment.
- How to set up an Azure AD with valid users.
Azure Portal Setup
First, you need to register a new app for Kepion on Azure Portal. This will enable the communication between Azure AD and Kepion.
New App Registration
1. Go to portal.azure.com and sign in to your account.
2. Switch to the Azure AD you want Kepion to use by selecting your account in the top-right corner of the page.
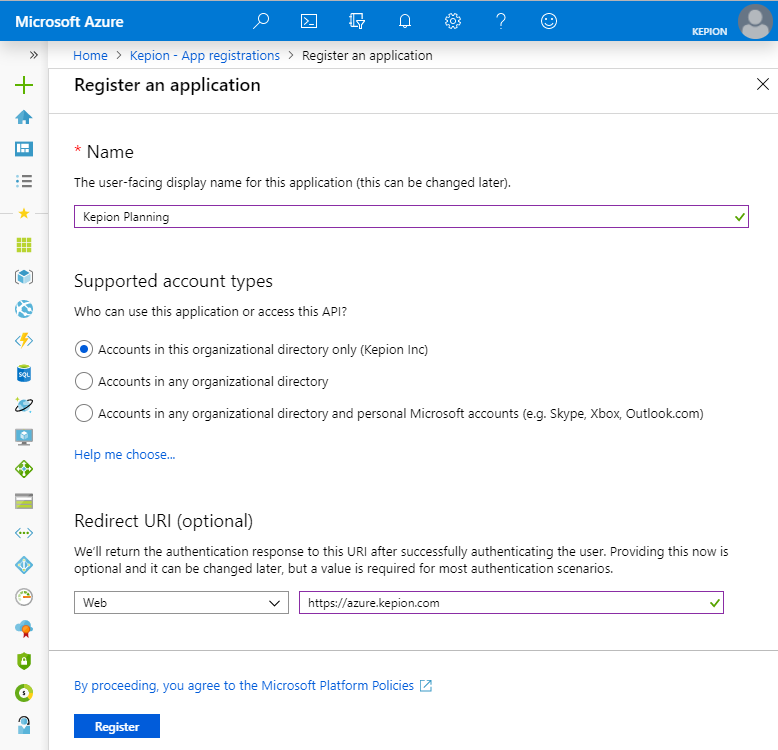
3. Select Azure Active Directory icon in the left navigation > App registrations > New registration.
4. Complete the Name, Supported account types, and Redirect URI fields (the base URL of your app where users can sign in), and click Create.
Now we need to configure the rest of our Redirect URIs.
5. Select the newly created registration.
6. Copy and save the Application (client) ID and Directory (tenant) ID where you can easily retrieve it for use later in the configuration process, then select Authentication.
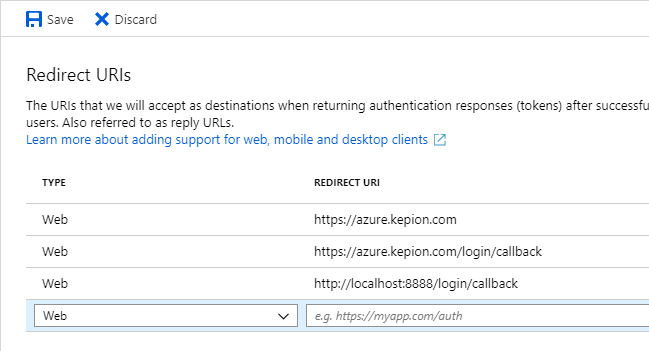
7. Add two /login/callback records, one for external use and the other for localhost and Save.
8. Use the following snippet for the localhost value:
http://localhost:8888/login/callback
The localhost callback will allow IT to login to Kepion from the local web server using their Azure AD credentials.
In our example we will use https://azure.kepion.com as the external URL, however when configuring for your environment, please use the friendly URL that is relevant for your organization.
9. Save the external reply URL together with the Application ID.
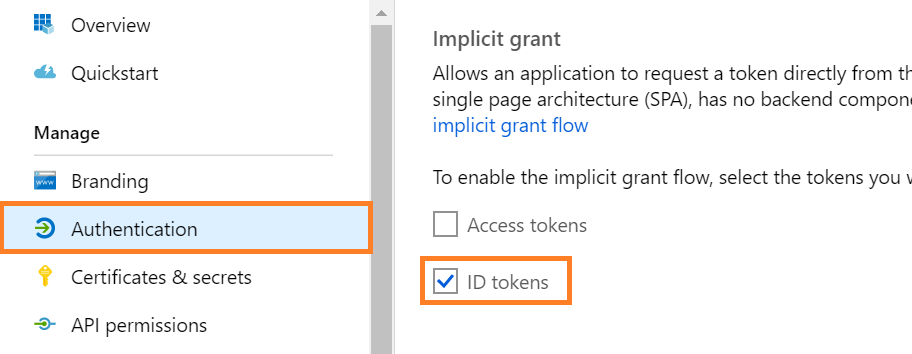
10. Under Implicit grant, select ID tokens.
API Permissions
Next, we'll configure the required permissions.
1. Select API permissions > Add a permission.
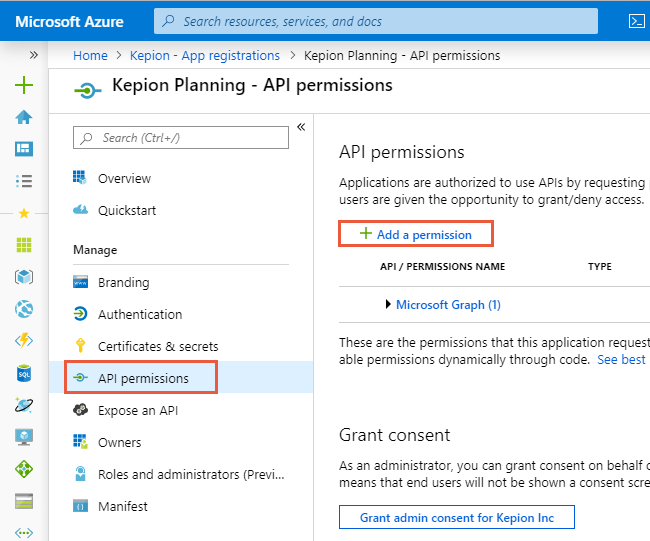
2. Select Microsoft Graph.

3. Under Delegated permissions > User, select User.Read under the User permissions.

4. Select Add permissions.
5. Select Application permissions and then Directory.Read.All under Directory.

6. Select Add permissions.
Your Configured Permissions should look similar to the setup below:

7. Select Grant admin consent for the permissions we added.

8. Select Yes.

Configure Client Secret
Now let's configure the key.
1. Return to the App Settings page and click Certificates & secrets.
2. Under Client secrets, click New client secret.
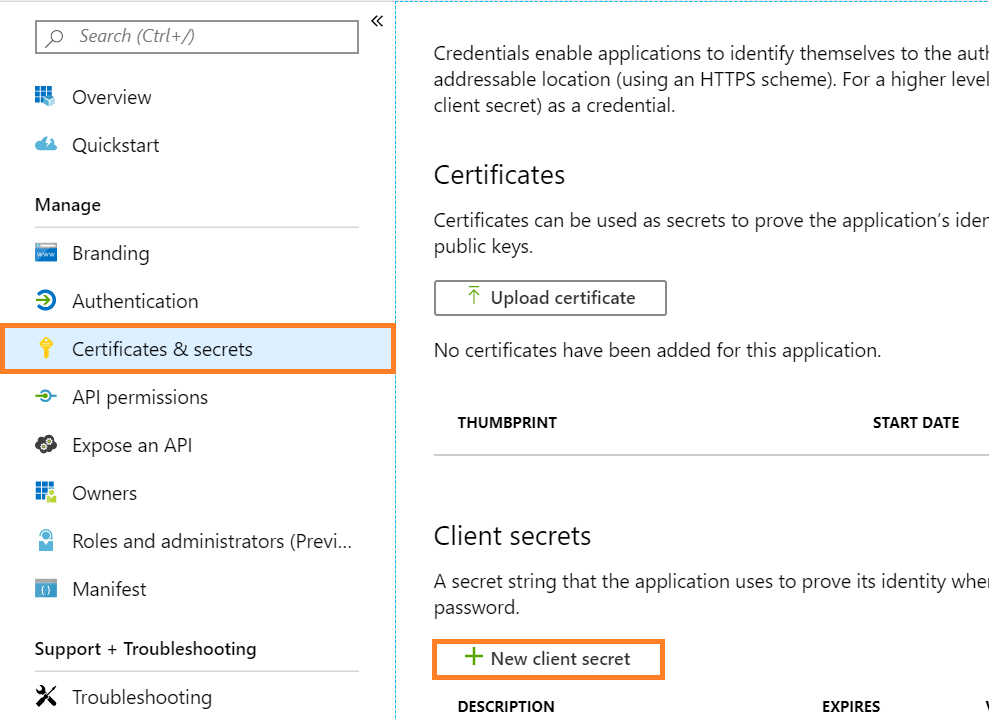
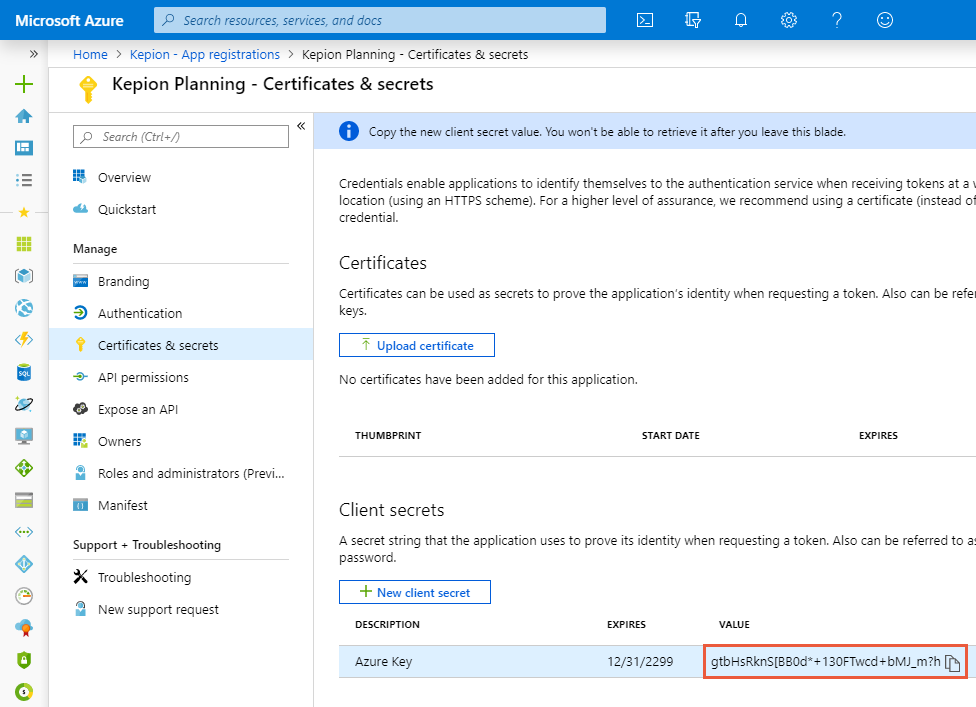
3. Enter the description {Customer Name} Key and select 730 days from the Expires dropdown.
4. Select Add.
5. Save the key value together with the Application ID and external reply URL
Attention: This is the only chance to save this key value. It is not retrievable at any point after you click away from this page.
Add Users to the App
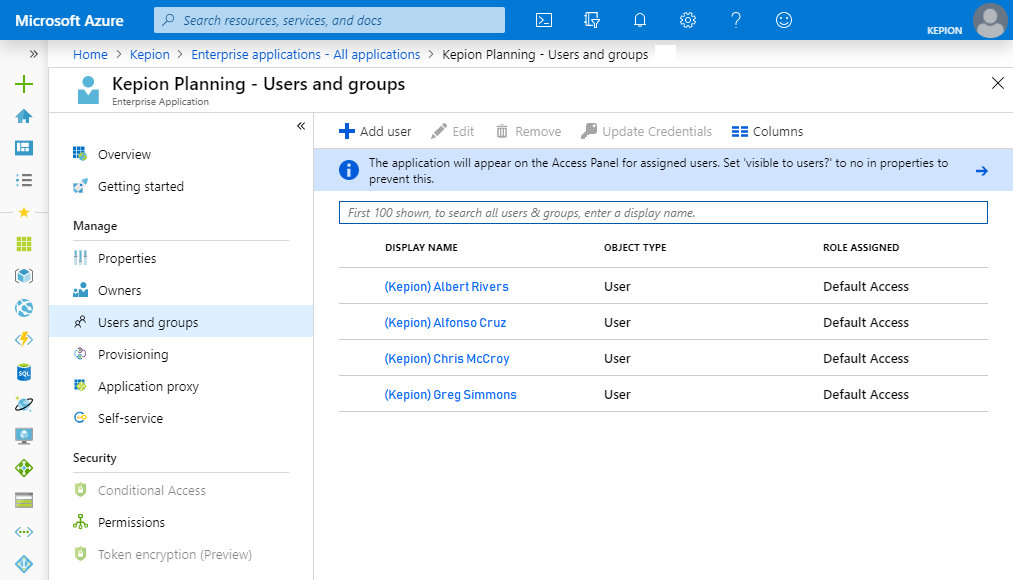
Next, you need to assign users and user groups to the application we just created. Assume all the users you want to grant access to Kepion are already added to your Azure AD. If not, add them to your Azure AD before going forward.
1. Click Azure Active Directory and select Enterprise applications.
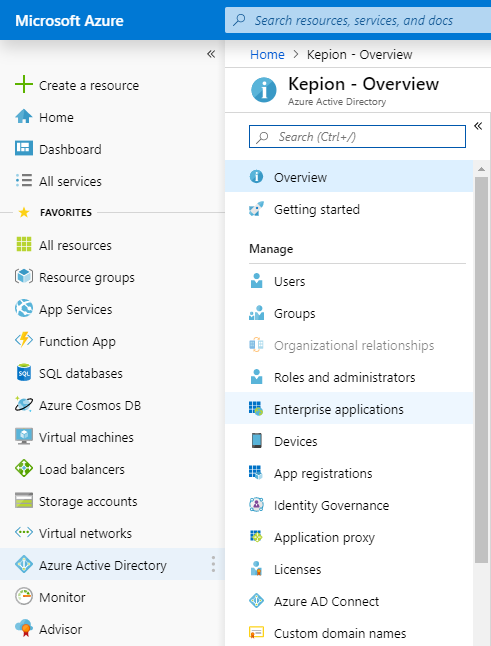
2. Go to All applications and select the relevant application.
3. Go the Users and groups and click Add user.
Gather Additional Info
While you are on the Azure Portal, note down the following information as you'll need them in the configuration later.
Kepion system administrator
After integrating with Azure AD, only users with a valid Azure AD credential (Windows AD credential is also required for Azure AD Integrated mode) can access Kepion. If Kepion was not originally installed by a Azure AD user, you need to select one from the Azure AD and add it to the Kepion_System database.
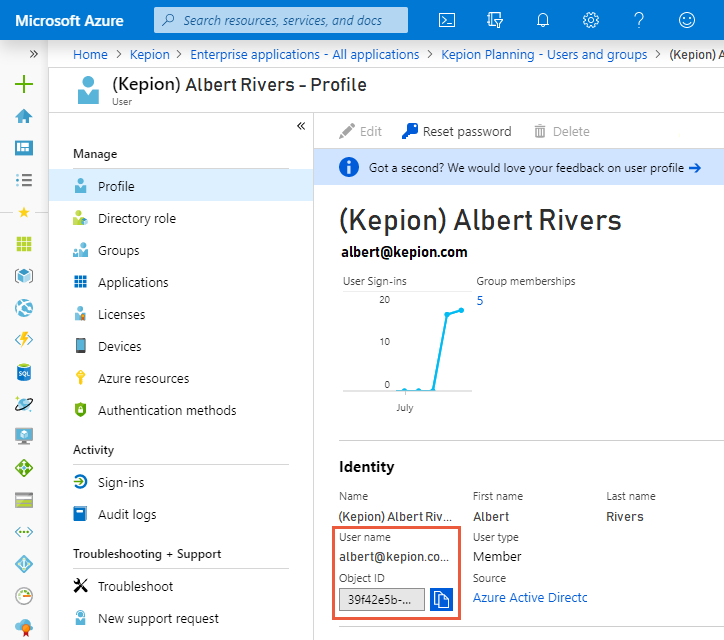
1. From the Users and groups blade, select the user that you want to add as the initial system admin.
2. Go to Profile.
3. Copy and save the ObjectID and User name.
Azure AD domain
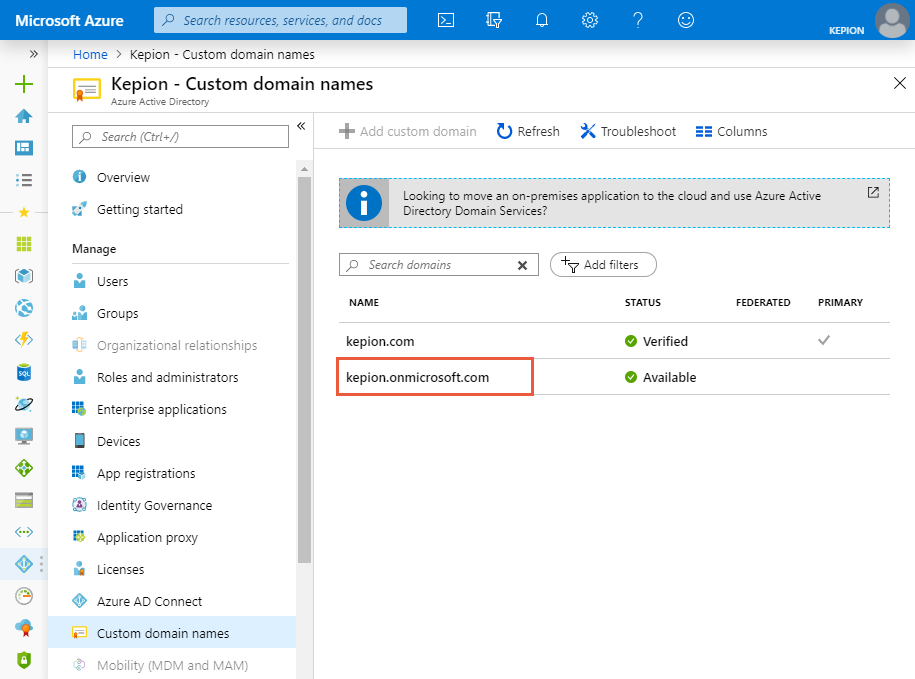
1. Select Azure Active Directory.
2. Select Custom domain names and locate the primary domain name.
3. Save the NAME value, as you will need to use it in later configuration.
Kepion Server Setup
Now that we've registered a Kepion app through your Azure Portal, we can now configure Kepion server's authentication mode. For a review of the supported authentication modes, see this article. The sections below will include detailed steps for the following Azure AD modes.
- Option 1: Azure AD Integrated
If your organization uses Azure AD to manage users and authentication, then Kepion can be configured to authenticate users through your own Azure Domain Services. Users can then sign in with either their domain credentials (domain\user) or their Azure UPN (user@domain.com).
- Option 2: Azure AD Standalone
If your organization uses Azure AD but it is not integrated with your domain, you can still use Azure to authenticate Kepion users; however users will be able to sign in only with their Azure UPN (user@domain.com). Also they will not be able to connect to Kepion via third-party tools.
Make sure you can connect to SQL Server and have permission to update tables in the Kepion_System and Application databases. Please jump to the section that is applicable to you.
Azure AD Integrated
1. Update [dbo].[SystemAdmins] in [Kepion_System] database.
Note: Kepion_System refers to the Kepion system database and used to be called CPMAppHost. Ensure you use the right system database name when following this procedure.
After integrating with Azure AD, only users with a valid Azure AD credential and Windows AD credential can access to Kepion. If Kepion was not originally installed by such user, you need to select a user from the Azure AD and add it to the [dbo].[SystemAdmins] table.
Add the administrator by entering the following into the fields:
| Column | Description |
|---|---|
| UserName | Use the Windows AD credential, e.g., <DOMAIN>\<NAME>. It should be the Windows AD credential of the user you saved earlier. |
| DisplayName | Also use the <DOMAIN>\<NAME> you identified above, or any friendly name that helps you identify the user. |
| Type | 1 |
| AzureADObjectId | Update this column with the Object ID you saved earlier. |
| ModifiedBy | -1 |
Here is an example of adding a system admin user to the table [dbo].[SystemAdmins] in Azure AD Integrated mode.

2. In [dbo].[Authentication], use an UPDATE command to AuthMode to AZURE_AD_INTEGRATED.
USE [Kepion_System]
GO

UPDATE [dbo].[Authentication]
SET Value = 'AZURE_AD_INTEGRATED'
WHERE Name = 'AuthMode';
3. Use an INSERT INTO command to add AuthTimeoutInHours (session timeout) and AzureConfig (Azure configuration settings) to the table.
USE [Kepion_System]
GO

INSERT INTO [dbo].[Authentication]
    ([Name]
    ,[Value])
VALUES
    ('AuthTimeoutInHours'
    , # of hours);
Note: Replace # of hours with your preferred session timeout.
[dbo].[Authentication] should look something like this:
4. For AzureConfig, copy and paste the following code snippet:
{
"issuer": "31b7g81f-100d-46c3-b043-9d6039bd",
"client_id": "3555d2a0-6214-4890-9a2d-a333f454abff",
"redirect_url": "https://azure.kepion.com/login/callback",
"secret_key": "b+Z15zRsIwldiKloxIrTLaCi3nZ6vk/eCs3fqUECkU8="
}
5. Replace the values above with the ones you saved earlier:
| Item | Description |
|---|---|
| issuer | Enter the Directory (Tenant) ID. |
| client_id | Enter the Application (Client) ID. |
| redirect_url | Enter the external reply URL. |
| secret_key | Enter the key value. |
6. Update the KepionSI.
If the KepionSI was previously under a different domain account, make sure to update it to a valid account within your integrated Azure domain. You can update the KepionSI quickly by running the Kepion installer, uninstalling, and reinstalling Kepion.
7. Perform AD Sync.
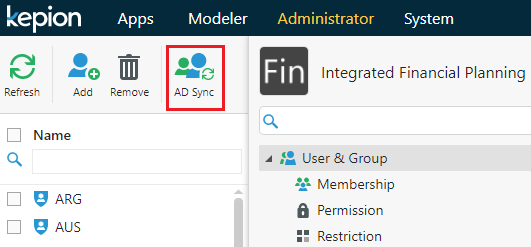
Go to the target Application in the Administrator module, select User & Group on the right pane, and select AD Sync. Once finished, the Azure Object ID column will be populated automatically. Repeat these steps for the other Applications in your environment.
8. (Optional) Use a PivotTable.
To allow connection to SSAS that resides on Azure VM from Excel PivotTable, please follow this guide to configure.
Now you’ve completed all the steps to integrate Kepion with Azure AD in Integrated mode. It’s time to test the settings.
Azure AD Standalone
1. Update the [dbo].[SystemAdmins] table in the [Kepion_System] database.
Note: Kepion_System refers to the Kepion system database and used to be called CPMAppHost. Ensure you use the right system database name when following this procedure.
After integrating with Azure AD, only users with a valid Azure AD credential can access to Kepion. If Kepion was not originally installed by such user, you need to select a user from the Azure AD and add it to the [dbo].[SystemAdmins] table.
Make sure to add the administrator identified in earlier to the [dbo].[SystemAdmins] by entering into the following fields:
| Column | Description |
|---|---|
| UserName | Update this column with the User name you saved earlier. |
| DisplayName | Also use the User name you identified above, or any friendly name that helps you identify the user. |
| Type | 5 |
| AzureADObjectId | Update this column with the Object ID you saved earlier. |
| ModifiedBy | -1 |
Here is an example of adding a system admin user to the table [dbo].[SystemAdmins] in the Azure AD Standalone mode.

2. In [dbo].[Authentication], use an UPDATE command to AuthMode to AZURE_AD_STANDALONE.
USE [Kepion_System]
GO

UPDATE [dbo].[Authentication]
SET Value = 'AZURE_AD_STANDALONE'
WHERE Name = 'AuthMode';
3. Use an INSERT INTO command to add AuthTimeoutInHours (session timeout) and AzureConfig (Azure configuration settings) to the table.
USE [Kepion_System]
GO

INSERT INTO [dbo].[Authentication]
    ([Name]
    ,[Value])
VALUES
    ('AuthTimeoutInHours'
    , # of hours);
Note: Replace # of hours with your preferred session timeout.
[dbo].[Authentication] should look something like this:

4. For AzureConfig, copy and paste the following string:
{
"issuer": "31b7g81f-100d-46c3-b043-9d6039bd",
"client_id": "3555d2a0-6214-4890-9a2d-a333f454abff",
"redirect_url": "https://azure.kepion.com/login/callback",
"secret_key": "b+Z15zRsIwldiKloxIrTLaCi3nZ6vk/eCs3fqUECkU8="
}
5. Replace the values above with the ones you saved earlier:
| Item | Description |
|---|---|
| issuer | Enter the Directory (Tenant) ID. |
| client_id | Enter the Application (Client) ID. |
| redirect_url | Enter the external reply URL. |
| secret_key | Enter key value. |
6. Update the KepionSI.
If the KepionSI was previously under a different domain account, make sure to update it to a valid account within your Azure domain. You can update the KepionSI quickly by running the Kepion installer and uninstalling and reinstalling Kepion.
7. Update [dbo].[Users] in the Application database.
Mapping by authentication mode
If you already have active users in the Kepion environment, and they need to access the saved plans after integrating with Azure AD, then you need to manually update the table [dbo].[Users] in each Application database. Otherwise, they cannot access the “old” saved plans (i.e. saved when Kepion was in the Windows AD mode).
Below is a comparison of the [dbo].[Users] table in different authentication modes.
User Types Supported in Kepion

Windows / Integrated / Limited (Supported Types: 1, 2, 3, 4)

Azure AD Integrated (Supported Types: 1, 2, 3, 4)

Azure AD Standalone (Supported Types: 3, 4, 5, 6)

Here is an example of the table [dbo].[Users] in a sample application database in Windows mode.

To seamlessly transition to the Azure AD mode, you should keep their UserID intact while updating the following fields:
| Column | Description |
|---|---|
| UserName | Update this column with the User name field from the Azure portal |
| Type | 5 |
| AzureADObjectId | Update this column with the Object ID field from the Azure portal |
Here is an example of the same [dbo].[Users] table in Azure AD Standalone mode:

Reset Kepion and Connect
To ensure all the settings have been applied, restart the Kepion web server by using IIS Manager. Once completed, launch Kepion either externally (e.g., https://azure.kepion.com) OR internally (e.g., http://localhost:8888/).
On the next page, use your Azure AD credential to sign in. You will be directed to a dashboard that shows all the Microsoft applications that you have access to. Click the App you created at the beginning of the article and you will be directed to the Apps page.
Tip: If you encounter any problems trying to integrate Kepion with Azure AD, check out this troubleshooting article for some possible fixes.
