
Introduction
Active Directory Federation Services (ADFS) is a Single Sign-On (SSO) solution, which provides users with authenticated access to applications incapable of using Integrated Windows Authentication (IWA) through Active Directory (AD). In this article, we will explain how to implement ADFS in your Kepion environment.
Tip: If you are unsure that ADFS is right for you, refer to the Authentication and Active Directory Options article.
Configure ADFS
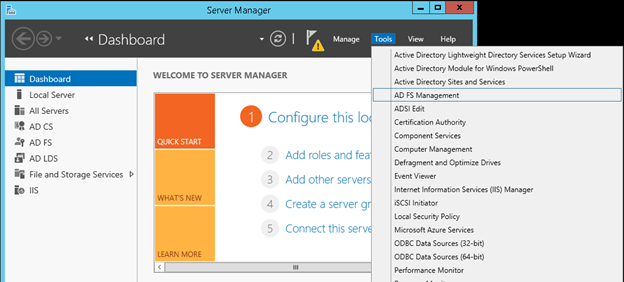
1. Open Server Manager and go to Tools > AD FS Management.
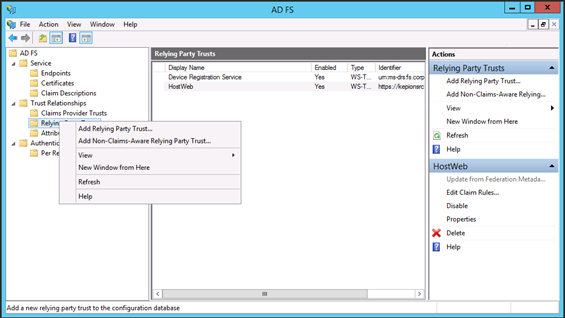
2. Right-click Relying Party Trust and select Add Relying Party Trust…
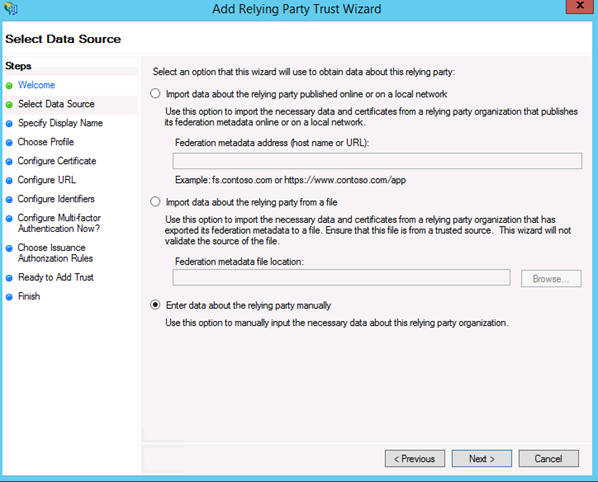
3. Select your data source and click Next.
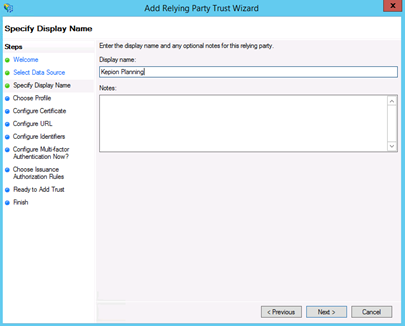
4. Enter a display name and any notes. Select Next.
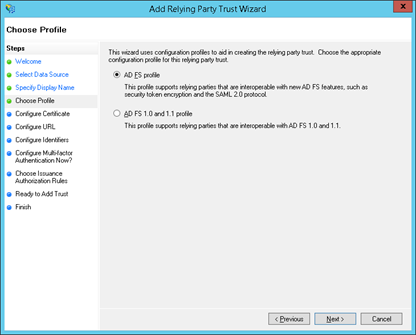
5. Select AD FS Profile and click Next.
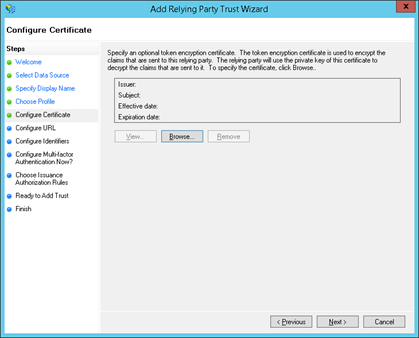
6. (Optional) Configure certificate if desired.
7. Select Next.
8. Select Enable support for the SAML 2.0 Web SSO protocol and enter your Kepion end point with /login/callback appended to the end in the Relying party WS-Federation Passive protocol URL field. Select Next when finished.
In the example below, the endpoint is https://connect.kepion.com
Note: As of June 1, 2023, we will not support WS-Federation Passive protocol.
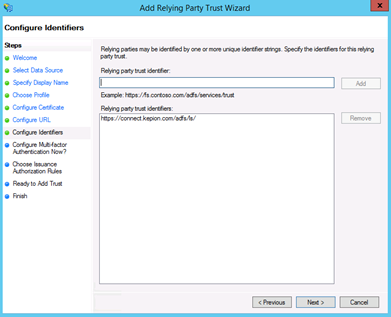
9. Configure Identifiers give your realm identifier as the Relying party trust identifier and select Next.
For example, this can be urn:my-kepion-app or any other resource URL identifier such as https://connect.kepion.com. It will be used later as the realm identifier to the ADFS setup.
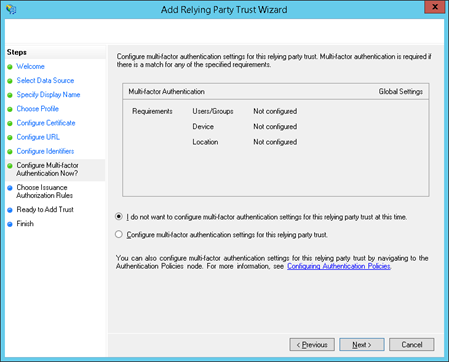
10. (Optional) Configure Multi-Factor Authentication.
11. Select Next.
11. Select Permit all users to access this relying party to configure Issuance Authorization Rules. Select Next.
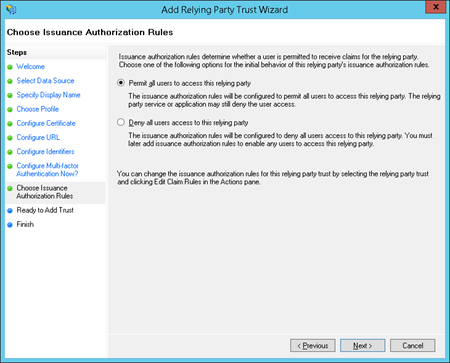
12. Select Close to finish.

Configure Claims
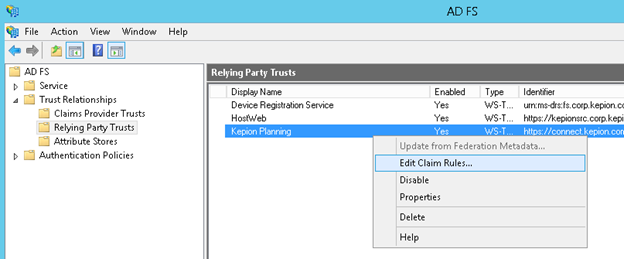
If the Edit Claim Rules dialog does not open automatically, right-click the Relying Party Trust you just created and select Edit Claim Rules…
1. Click Add Rule… and select the Send Claims Using a Custom Rule as the Claim rule template.

2. Enter a name for the claim rule and write the following custom rule, which allows Kepion to retrieve the login user info.:
c:[Type !~ "^(?i).+(group|primarygroup)+sid$"] => issue(claim = c);
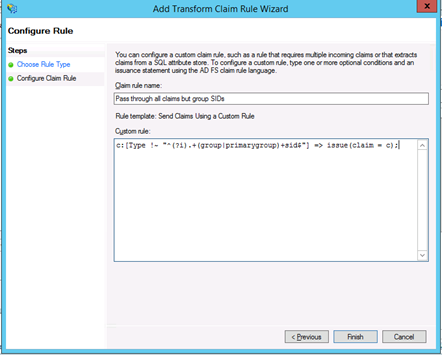
3. Click Finish.
4. Open Windows PowerShell in administrative mode.
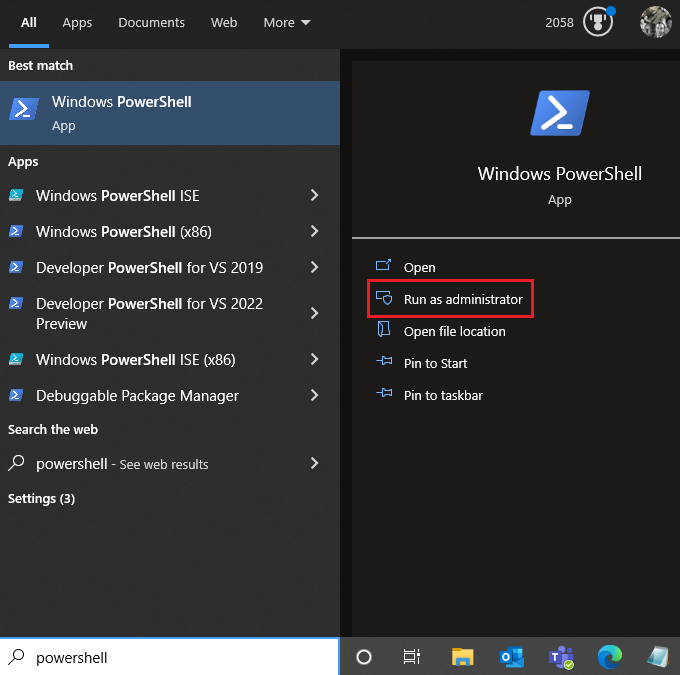
5. Run the following code to set the JWT Token:
Set-ADFSRelyingPartyTrust –TargetIdentifier "urn:my-kepion-app" –EnableJWT $true
Note: Use the "realm identifier" (i.e., relying party identifier) you specified in the previous steps. In the above script, the realm identifier is "urn:my-kepion-app".
Configure Kepion
1. Ensure Kepion is using an HTTPS Endpoint.
For example: https://connect.kepion.com.
2. Download the federation metadata from the ADFS server.
For example: https://fs.corp.kepion.com/federationmetadata/2007-06/federationmetadata.xml
3. Locate the signing certificate:
<EntityDescriptor ID="_00dfbf00-eb22-4856-ab2b-736a6c34c59d" entityID="http://yru-server.corp.yru.com/adfs/services/trust" xmlns="urn:oasis:names:tc:SAML:2.0:metadata">
  ...
<RoleDescriptor xsi:type="fed:SecurityTokenServiceType" protocolSupportEnumeration="http://docs.oasis-open.org/ws-sx/ws-trust/200512 http://schemas.xmlsoap.org/ws/2005/02/trust http://docs.oasis-open.org/wsfed/federation/200706" ServiceDisplayName="YRU Corp" xmlns:xsi="http://www.w3.org/2001/XMLSchema-instance" xmlns:fed="http://docs.oasis-open.org/wsfed/federation/200706">
    <KeyDescriptor use="signing">
<KeyInfo xmlns="http://www.w3.org/2000/09/xmldsig#">
        <X509Data>
<X509Certificate>MIIC6jCCAdKgAwIBAgIQRC2A8qyY6pRPqjjCNYdnwTANBgkqhkiG9w0BAQsFADAxMS8wLQYDVQQDEyZBREZTIFNpZ25pbmcgLSB5cnUtc2VydmVyLmNvcnAueXJ1LmNvbTAeFw0xNjA2MTEwNTI1NTlaFw0xNzA2MTEwNTI1NTlaMDExLzAtBgNVBAMTJkFERlMgU2lnbmluZyAtIHlydS1zZXJ2ZXIuY29ycC55cnUuY29tMIIBIjANBgkqhkiG9w0BAQEFAAOCAQ8AMIIBCgKCAQEA4LeYVL+Kh7Uj9Sf5uN+xUBcc27evLC6kKsu3G2j87ZERy0t9Ak6xz7DmArqUTZ3CKvW8NoSG9BPu985axEdmOeygtXjkSYRlcOK0o8SLZNoAHYXWDQ0Z8sXUEGShVeALkmVopXzJMq2wwiXc52uLGHAuzGLNfapgjBOoMWcC2SlWsjvAdrOw3je19PSGd0jZgvzsyvmAFhQ7I5hO+WWYvjrp44wdTpBlHvzbW6kwiYGEpk6QeD93nmrftUi/hI3RoBRFFDIjz/NnnAf7uuDNbjxnzCx1/CshG+ogvs0saEvweqorC84HHOqnQMcja0TQ9XY7giLPXtcWW7BINPMXyQIDAQABMA0GCSqGSIb3DQEBCwUAA4IBAQBjq4lctSWlQv30tzlrYL4/wNpMrWTv1QGuQTtOO9SfkB1isYl3Adif5gS9n3IbyG01TM/l73GlQIP5kSSzBKI01rv6FL4ivndLS+xEJT1RW8SFPweyLBD9+bNCW+lSZ0B72rJEdco+SI9NglHtejy6Ux/G1/5CTRFfAsnX7ZoYCQPZ963RxXTCAFEyahjMiLXn0eVRKKqh0Amj2yFo8OwvlJYrqpzFCnTgoSe/T6Mp9zoFGH4mOzYTmHoA66HOMoMfw6zbGWD8TXLxloJsM8Gn01C8rwV6Z9CHLdDtsc3LgCR1wEGednr0efAln8hmDB/LNOMctFwZBV732l13kg8Z</X509Certificate>
        </X509Data>
      </KeyInfo>
    </KeyDescriptor>
    <fed:TokenTypesOffered>
<fed:TokenType Uri="urn:oasis:names:tc:SAML:2.0:assertion"/>
<fed:TokenType Uri="urn:oasis:names:tc:SAML:1.0:assertion"/>
    </fed:TokenTypesOffered>
    <fed:ClaimTypesOffered>
<auth:ClaimType Uri="http://schemas.xmlsoap.org/ws/2005/05/identity/claims/upn" Optional="true" xmlns:auth="http://docs.oasis-open.org/wsfed/authorization/200706">
<auth:DisplayName>UPN</auth:DisplayName>
<auth:Description>The user principal name (UPN) of the user</auth:Description>
      </auth:ClaimType>
    </fed:ClaimTypesOffered>
    <fed:PassiveRequestorEndpoint>
<EndpointReference xmlns="http://www.w3.org/2005/08/addressing">
<Address>https://yru-server.corp.yru.com/adfs/ls/</Address>
      </EndpointReference>
    </fed:PassiveRequestorEndpoint>
  </RoleDescriptor>
  ...
</EntityDescriptor>
4. Open SQL Server Management Studio (SSMS) and execute an UPDATE command to set the AuthMode to ADFS.
USE [Kepion_System]
GO

UPDATE [dbo].[Authentication]
SET Value = 'ADFS'
WHERE Name = 'AuthMode';
Note: Kepion_System is the default Kepion System database name and was called CPMAppHost before the release of Kepion version 6.1.22257. The name could also be different if you changed it. Ensure you use the appropriate System database name in the SQL statements.
6. Execute an INSERT INTO command for the following keys:
- AdfsIssuer
- AdfsRealm
- AdfsX509Certificate
- AuthTimeoutInHours
For example, the AuthTimeoutInHours key (session timeout) would require the following query:
USE [Kepion_System]
GO

INSERT INTO [dbo].[Authentication]
    ([Name]
    ,[Value])
VALUES
    ('AuthTimeoutInHours'
    ,1);
Note: Replace the 1 value with however many hours you prefer for your session timeout.
AdfsIssuer, AdfsRealm, and Adfsx509Certificate are necessary for the protocol. You need to enter in values for your personal environment
Your table should look something like this:

Note: Use the downloaded signing certificate as the value for X509Certificate.
IFRAME Integration
In order to enable hosting within an IFRAME, you must include the following script tag:
<script src="https://connect.kepion.com/embed.js"></script>
In addition, each IFRAME must contain a query parameter of embedfed=1.
<iframe src="https://connect.kepion.com?embedfed=1#/designer?appid=1"/>
Note: It must be before the #, but after the ?